Saturday, May 31, 2014

The Best Laid Plans of Mice and Men...

Well, as it turns out, my next range day was 4 hours after my last post, ha ha ha! Fortune favors the brave, i.e., those foolhardy souls who will brave a trip to the gun range on a rainy day.
 
I brought my son, Yuri with me, and we both had a blast. Yuri was shooting open sights, from a bench rest, and the guns he was shooting were so big, heavy, and hard for him to hold (he's only 7) that I felt that he would benefit from targets being placed at "point blank engagement range," i.e., a distance of 4 meters (13 feet.)
 
Yuri shot my new (to me) circa mid-1980's made-in-West-Germany Diana Model 5G air pistol, and my circa 1934 Diana Model 27 air rifle. The pistol is made for an adult shooter, and is hard for him to grip properly. The rifle is big, and very heavy (he can barely lift it.)
 
First of all, I'd like to say how proud I am of him; he made some pretty great shots once I showed him how to get the proper sight picture. He also made a great shot that I almost got on camera, but alas, my phone died in the middle of recording it. He shot an empty shotgun shell off the top of a wooden post at 4 meters with the Model 27 (from a bench rest) and the shell flew, spinning forward, end-over-end, like a football being kicked for a field goal! The shell probably traveled a good 15 feet! I wish I had the video of that! We might go back to the range tomorrow after church lets out, just for a minute or two, to see if he can duplicate the feat. If we do, I will post the video immediately.
 
I also tried my hand at shooting the shotgun shell. I used the Diana P5 with BSA red dot, shooting from the same distance, sitting down, one arm extended (no bench rest.) Here is the result. I couldn't believe my eyes! What a powerful little pistol the P5 is!


Yes, that's a pellet lodged in the side of the empty shell!


As for my previous plans, I had to throw them out the window. There are two reasons for this; the first being that it started raining, which cuts visibility way down, even on easy-to-see targets. The second reason is that even my "large" 1-inch bullseyes in a 1.5 inch box are almost impossible to see at a distance of 15 meters. I only took one shot at that distance, before deciding to move the target in closer.

I shot 3 pellets at each target, at a range of 7 meters, which was still moderately difficult to see in the rain. Here are the results:


The 1 shot that I took at 15 meters is circled.


I shot the first target once at 15 meters, and 3 times at 7 meters. I shot the next 5 targets three times each. I made a counting boo-boo, and shot the last target 4 times. Considering the small targets, and decreased visibility, I'd say these are some fair groupings.

By the way, the shotgun shell, and the small targets, were shot with RWS Super-H-Point pellets. All shots fired from a bench rest, using a 1x mag BSA red dot scope.

While I was at it, I also shot the Diana 5G, with hooded front sight, at a distance of 7 meters, using a bench rest. I sighted it in, making adjustments, on two targets (not shown here) and it took about 30 shots to get it right where I wanted it. Once I was satisfied, I shot the following two targets, 5 shots at each, without making any further adjustments:


Closeup of first 5-shot grouping.


Closeup of second 5-shot grouping.


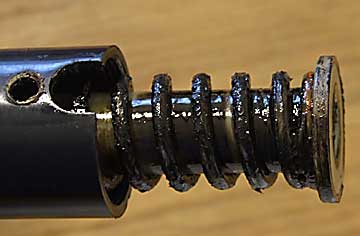
While shooting, I noticed a bunch of gunk (old lubricant?) in the breech of the gun:


Not sure what it was, but I got a toothpick and removed it.


Once the gun was clean, I handed it to Yuri, who promptly shot the following targets (again, at a distance of 4 meters, from a bench rest, old-skool open sights.)


He shot this target 12 times. The red box is 4.5 inches wide. The bull is .375 inches square.


He shot this one 6 times. I think this was his best grouping of the day.


When he noticed I was only shooting 5-shot groups, he did the same.


Packing up, about to leave. "Please, Dad, one more shot?" BAM! Bullseye!
I was so proud of him!


In the time it took Yuri to shoot these targets (plus a few shots taken at metal targets, and at leftover CHL class targets, etc.) I shot the following targets with the P5, all at 7 meters, from a bench rest, with the BSA red dot. By now, the rain had let up a bit, and there was only a light sprinkle still going.


Overall performance of the P5 at 7 meters. Shots circled in red are stray shots from Yuri, ha ha.


RWS Super Mag pellets closeup 001.

RWS Super Mag pellets closeup 002.


RWS Super H Point pellets closeup 001.

RWS Super H Point pellets closeup 002.


RWS Meisterkugeln pellets closeup 001.


RWS Meisterkugeln pellets closeup 002.


 I took pictures of the pellet tins that were in use, but I figured since this post was already pic-heavy, I'd forego them this time. The stats on these pellets are well-known, and easy to find.
 
All-in-all, it was a great range day. Yuri did rather well for a seven-year-old who's only been to the range a total of three times. And I had great success with the Diana P5 / BSA red dot. That's the one that Yuri will inherit when he's 16 years old. At 7 meters, this gun has very repeatable accuracy, and it seems to like all medium and heavy varieties of RWS pellet.
 
When I get my other P5 (Tru Glo red dot) and my Hatsan Supercharger back from the gunsmith, I think I am going to sight them both in at 20 meters. Using a pistol to do anything, whether it's field target, bench target, or hunting, I don't think you'll be aiming at anything more distant than 20 meters. I am also going to design some homemade targets for that distance. I will show them to you in the next post. Until then, may all your pellets fly true!
 
P.S. For an old skool, open sight gun, the new 5G shoots like a dream; it's clean, and in what most collectors would call "near mint" or "very fine" condition. It shoots HARD, and must have been excessively oiled by the previous owner. During the first 10 or so shots, every time I would break the barrel to load the next round, a fine wisp of smoke would issue from the breech. Regardless of this, the pistol shoots as well as the day it was made, and is an excellent, high-quality, shining example of fine, German craftsmanship and engineering. Definitely a keeper!


Plans For Next Range Day

Ok, I have made some plans for my next range day, whenever that happens to be.

I got Ed to send me a new version of his 100-bulls-per-page target, with colored bulls. I will be shooting this target at 15 meters, using the Hatsan Supercharger, with the x2 Mag Tru Glo red dot scope.

I will shoot 33 of these bulls from the bench, 33 of them from a standing position using cup and saucer (police style) stance, and the last 34 bulls will be shot from a standing position using one-handed, full-arm-extension (Olympic style) stance.

Here is what the new Ed Canoles targets look like:

I Had Ed Make Some Solid Bulls For Me.


I will also be shooting my new target at 15 meters, using the Diana P5, with the x1 Mag Tru Glo red dot scope. I originally designed this target to be shot at 10 meters, but I want to push the envelope a bit on my next time out. These new targets are 20 bulls per page. I will be shooting 3 shots at each bull, for a total of sixty (60) shots.The first 7 bulls will be shot from the bench, the next 7 will be shot cup and saucer, and the last 6 bulls will be shot Olympic style.

Once I am hitting with consistent accuracy at 15 meters, I will move the targets out to 25 meters, and shoot all the bulls from the bench. I will NOT be making scope adjustments; I will be changing my Point of Aim (using "holdover") to hit the bulls.

I believe that sighting my pistols in for 15 meters will allow me to shoot them at 25 meters with only a minor adjustment in Point of Aim.

Here is what the new 20-bull target looks like:

My New Target, With 20 One-Inch Bulls.


I measured my new target, and the printed version is pretty close to what Microsoft Publisher said they would measure when printed. Check it out:


The Outer Box Is 1/64 Of An Inch Off. I Can
Live With That.


The Inner Box Is 1/32 Of An Inch Off.
No Big Deal.


The Bull Is Exactly One Inch. Perfect.


Once I get these pistols shooting the way I want them to shoot, I can try "special" targets, such as tin cans, metal, animal-shaped field targets, etc.

I also intend to shoot the Hatsan at 100 yds. again, to see just how far I can push the pistol envelope! Wish me luck!


Tuesday, May 27, 2014

Range Day, Mixed Feelings

Well, I finally got out to the range again last Saturday (May 24, 2014) and I must report that I have mixed feelings about the results.

Long story short: the Hatsan performed great, for the first 25 shots or so, then it became incredibly hard to cock. I suspect a broken or cracked mainspring.

The Diana P5 performed great, no spring issues, however, I noticed that at the end of the cocking cycle, the automatic safety failed to engage about 7 times out of 10.

Both guns have been returned to the gunsmith, and I hope to have them back soon. Hopefully, both repairs will be quick and easy.

But in the meantime, let's look at the visuals from Saturday's shooting fest:

This is what I had in the Hatsan.


This is what I had in the Diana.


Saturday's Fresh Target.


The view from the bench at 10 meters.


The Hatsan started out great; I began by trying to sight in the new red dot at a distance of 10 meters. I shot groups of 5 from a bench rest. This Tru Glo 2x Mag red dot scope was awesome! I really enjoyed shooting it.


First 3 shots were high, so I adjusted down for the last two.


After shooting those 5 shots, I taped the hole so that I could re-use the aim point.


Another decent grouping.


Again, covered up for re-use.


Quite an improvement on the second try.


Again, I was really happy with the second time around.


Even those 3 shots that were high had a good grouping, measuring 1 inch.


Worst group of the day, at the center of the target. Measurement: 1 and 2/16 inches.


Best group of the day; if you measure true center to true center (A-B) it's 7/16 of an inch. If you
measure between outer edges (1-2) it's half an inch. Either way, an excellent performance.


At this point, the Hatsan become really difficult to cock; I was in the middle of a 5-shot group, and the first two shots were great. But shots 3, 4, and 5 were WAY off. After this occurrence, I put the Hatsan down for the day, and switched to the Diana.


Shots 1 and 2 were SPOT ON. Shots 3, 4, and 5: Not so much.


The first thing I did with the Diana was a little 10 meter sighting-in with the new (1x Mag) red dot. Here are the results: (5-shot groups)


Not bad for a first attempt.


Let's cover 'em up, make some adjustments, and try again.


Not bad at all! This was the best group of the day for the Diana.


I had intended to shoot some of the Ed Canoles targets, but my printer ran out of ink, and I was unable to print them. So I drew my own version on a sheet of graph paper. I call them my "Quasi-Canoles" targets.I drew them with a fine-tip pen (the only thing I had available at the time) and they ended up being REALLY hard to see. Check it out:


Boy, was I ever optimistic! 10 meters indeed! LOL :D


Let's change that to 5 meters.


My Quasi-Canoles targets, plus a few orange bullseye stickers, which turned out to be
much easier to see, even at 5 meters.


I had a little trouble making adjustments on the red dot; but it was my fault. I forgot how large the adjustments have to be for short distances. But I had fun, at any rate; I have color-coded the groupings, to make them easier to follow. By the time I got down to the orange stickers, I stopped adjusting the scope, and started using a different aim point. The orange stickers were shot "lolipop style," i.e., aiming just below bottom center-edge of the sticker. (On a clock, imagine aiming at the 6, while expecting a POI of dead center of the clock face.)


First go around, all 6 shots were low.


Final results (color coded) all 5 meters from bench rest, using 1x Mag red dot. I plan to do 
a lot better next time, because I will have this fiasco fresh in my memory! Ha ha!


AFTERMATH: Our "fresh target" isn't so fresh anymore. This is what it looked like
at the end of the day's shooting. You will notice other groupings that I didn't bother to post,
because this post was getting really pic heavy to begin with.


Well, folks, this concludes another range day for the Scientific Airgunner. Please let me know what you think in the comments section, even if it's severely critical. The only way we learn and improve is by making mistakes. Cheers!


Tuesday, March 25, 2014

New Series: AIRGUN WISDOM [AIRGUN WISDOM #1]

I have been wanting to do this for awhile; I am starting a new series about the do's and don'ts of airguns. The series will be called "AIRGUN WISDOM." I hope that you will find these posts informative and entertaining. Please feel free to comment if you feel that something I've said is in error, or if you think I left out something important; I am by no means an expert on airguns, but I do consider myself an advanced user. And I am always learning new things, and sometimes, even getting fresh perspectives on things I thought I knew.

This is AIRGUN WISDOM #1: Don't Oil Your Gun!

It sounds counter-intuitive, I know! But it's true; An airgun does need a little lubrication on the seals and external pivot joints, and keeping the barrel clean and free of debris is important; however, companies like Umarex promote maintenance schedules which are unrealistic, and in some cases, even downright EXCESSIVE. 

The following screen shots are from the owner's manuals for the Diana 460 Magnum, and the Diana P5 Magnum. Take a look:


Taken from the Diana 460 Magnum Owner's Manual


Taken from the Diana P5 Magnum Owner's Manual.


Notice, the 460 manual comes right out and says it: "The working parts, like the piston and main spring, need no lubrication." The Diana P5 manual does not say it directly, but it also makes no mention of oiling either the piston or the main spring. 

Basically, all that needs be done to the average Diana airgun is to keep the barrel clean and free of debris, to apply the slightest and most seldom lubrication to the seals and external pivot joints, and the wiping of the outside of the gun very lightly with an oily cloth after use (Red Feather from The Dianawerk Collective recommends Birchwood Casey Barricade) to prevent rust. (Your fingerprints are oily; if you don't wipe the fingerprints off of your gun, they will eventually cause the metal to rust.)

But if you've looked around, you're probably thinking, "Ok, so there's a video on the Umarex website which says that you need to lubricate your breech seal and your compression chamber every 1000 shots."

This is not entirely true; periodic lubrication in the manner described by Umarex is a dated procedure, which is not usually necessary with modern airguns. Such lubrication practices are more appropriate for older (antique) airguns having leather seals, rather than synthetic ones.

-------------------------------------------------------------------------------

(Taken from Tom Gaylord's Pyramyd Air Blog:)

"Leather piston and breech seals need lots of frequent oiling. Many of the older guns are also lower-powered, so the oil can be petroleum-based, if you like. For a gun with a leather piston seal, I would oil the seal every time you shoot the gun if you only shoot it occasionally, or once every two weeks if you shoot all the time. Drop 5-10 drops of oil down the air transfer port and allow it time to soak into the leather [...] if the gun has a leather breech seal, drop two drops of oil on the seal and allow it to soak in. If the seal is synthetic, it doesn't need any oil. It will be oiled by the small amount of oil that's blown from the transfer port as the gun is fired."

"Guns with synthetic seals require far less lubrication. The best of them are the RWS Diana rifles whose piston seals are nearly self-lubricating [...] On average, a single drop of silicone chamber oil every 1,500 shots or once a year is about all they require. You can double that time for RWS Diana guns. The oil goes down the transfer port, the same as for guns with leather seals."

-------------------------------------------------------------------------------

First of all, Tom Gaylord is a widely respected airgun writer who maintains a blog for Pyramyd Air, a very respected internet airgun retailer that is dedicated to good customer service.

But notice (in regard to chamber oil) how Tom says that it's every 1,500 shots, not every 1,000; he also says to double that for Diana airguns. Therefore, a Diana might need a drop of chamber lubricant every 3,000 shots or so. A SINGLE DROP. In the Umarex video, they recommend THREE drops. That's 300% more lubricant, and three times more often, than Tom recommends for synthetic seal guns, and it is this kind of excessive lubrication that causes airgun tuners to recommend against lubing your gun at all.

For example:

-------------------------------------------------------------------------------

(Taken from Charlie Da Tuna's website:)

Don’t oil your gun.

Don’t use or introduce any lubes into your compression chamber through the port or into the barrel. Also, do not use or introduce oils on the spring or into the cocking slot of the action. This lube migrates to the cylinder walls and weeps its way into the compression chamber. 

The reason for this is that it causes detonation that damages the seal as well as causes the spring to fatigue and collapse and can actually cause the spring to fracture. It greatly increases the double recoil shock and that can damage your scope. It also causes your gun to have erratic velocity that seriously impacts the accuracy.

If properly tuned using the proper lubes, your gun can go for years without needing to be lubed internally although external linkage lubing and maintenance will need to be ongoing.  

-------------------------------------------------------------------------------

The Umarex video also recommends oiling the main spring, with as many as 6 drops of lubricant; Tom Gaylord has a different point of view, and it's a viewpoint that I strongly agree with. 

-------------------------------------------------------------------------------

The following is taken from Part 3 of Tom's "Oil Series":

Here I have to burst some bubbles, as there has been a great disservice done to airgunners for the past 40 years. I'm speaking about oiling the mainspring of a gun. The disservice is the fact that oil isn't normally the right lube to use on a mainspring. It is, however, the easiest lube to apply, which is why I think it has been pushed so hard. On many spring guns, there's a cocking slot through which at least part of the mainspring can be see once the gun is out of the stock, so airgun dealers have told shooters they should apply oil through that slot.

But oiling isn't enough for most mainsprings. They need grease, and the only way to do the job right is to disassemble the action and apply the grease directly to the spring. Sorry, folks, but that's a fact. This is especially true for the modern magnum springers. Oiling just doesn't get it, but it's easy and shooters feels they've done their part when they do it.


This picture is from Tom Gaylord's Pyramyd Air Blog.
This is the correct amount of black tar for a mainspring for a rifle that vibrates a lot. For one that has a spring that's sized closer, you only need a fraction of this amount.

With guns that shoot under 12 foot-pounds and have leather piston seals, I like to see a medium-weight grease used--something lithium-based, perhaps. For all others, I like the more viscous greases that don't fling off--the black tars, if you will. How much you use depends on what you're trying to accomplish. You may remember that I recently tuned an HW55 with just a kiss of black tar. It sped up the gun without bringing any vibration into the operation. That's about as perfect as you can hope for.

-------------------------------------------------------------------------------

Well, I think this pretty much says it all; your airgun doesn't need a lot of internal lubrication. In most (not all) cases, there is a good deal of moly and tar already inside the gun from the factory, and this stuff is thick, like a paste. It wears off VERY SLOWLY, unlike the more liquid / less viscous lubricants that Umarex and other companies are hawking. If you ever think that your gun is getting dry (there have been some reports recently on local forums, circa Feb-Mar 2014, that Diana guns have been shipped "nearly dry," although I have not seen the term clearly defined,) and you think that the main spring or piston is in need of lubrication, do yourself a favor, and take the gun to your local airgunsmith, or mail it to a reputable airgun tuner, and let them re-moly it for you. You'll be glad you did.


Monday, March 17, 2014

Back From The Gunsmith

Ok, here is the full post that the sneak peak promised. All of my guns are back from the gunsmith; all but one of them had a picatinny rail and optics installed. The last one was the antique Diana 27, it was in for a re-seal, re-lubrication, sight alignment, and cleanup. All of the pistols are sporting new Cerakote, which unfortunately means that the model number and logo for these pistols is no more (see below.) Also, you might notice that the Diana pistols don't have the right-handed grip; I ordered the left-handed grips for both pistols, and swapped out the right sides, thus giving both of these Diana pistols ambidextrous grips.

The Hatsan 25 Supercharger (.22 caliber,) and two Diana P5 Magnums (.177 caliber.)


The Hatsan Model 25 Supercharger with Tru Glo red dot scope.


Close-up of the Hatsan, to show the custom Picatinny rail. The logo is gone.


My Diana P5 with its new Tru Glo red dot scope.


My son's Diana P5 with its new (used) BSA red dot scope.
He is 7 now; he will inherit this gun when he turns 16.


Close-up of my P5  to show the custom Picatinny rail. As with the
Hatsan, the Diana logo on top of the gun has been covered by Cerakote.


Close-up of my son's P5  to show the custom Picatinny rail. As with the
Hatsan, the Diana logo on top of the gun has been covered by Cerakote.


My antique 1934-era Diana Model 27, all cleaned up and ready to roll.


I went a little picture happy with the Diana 27. There's no reason for this close-up
view, other than the fact that I love looking at this gun.


A thing of beauty is a joy forever.


My local gunsmith, Benny; the guy who made it all possible.


Well, that's all for now; when I return, I will be shooting these guns, posting data and target photos as I go. Until then, may all of your pellets fly true!


Friday, March 7, 2014

A Very Interesting Thread From The Crosman Forum

Hey Guys and Gals,

I thought I would share this with you all. The following thread from the new Crosman Forum has some very interesting technical information about pellet penetration:

Penetration and Expansion Testing

March 6 2014 at 10:58 PM By RSterne

Here is a series of posts from a thread on another Forum where I tested a variety of pellets at several energy levels in melt-and-pour soap.... I am just copy-pasting the posts below.... The first set of tests are .22 cal at 20 FPE.... 

Every once in a while I try and find a new test medium for assessing pellets.... Over the years I've tried, wood, phonebooks, paraffin wax (all too hard), water, plumbers putty, playdoh, and ballistics gel (IMO all too soft and/or temperature sensitive), and I recently tried a bar of clear soap, which showed promise, so I ordered some melt-and-pour soap online, and after a few initial test shots, cast it into some bricks for pellet testing.... I cast the bricks in 8 x 8 square Pyrex dishes, about 1.5" thick, and using my Grouse gun, shot into the edge of the bricks.... This gun shoots at 20 FPE quite consistently over 16 shots, with lighter pellets achieving about 19 FPE and heavy ones about 21 FPE, which is typical for a PCP.... Here are the results, and some observations.... 

Top row right to left: 

Gamo Match Wadcutter 13.7 gr. 
Gamo Hunter Domed 15.1 gr. 
Gamo Magnum Pointed 15.1 gr. 
Gamo Roundball 15.1 gr. 
Gamo Master Point 16.4 gr. 
Gamo TS-22 Rounded Point 21.6 gr. 
Hatsan Domed 14.3 gr. 
Predator Big Boy Pointed 26.0 gr. 

The wadcutter shortened and expanded slightly, and had the least penetration.... The roundball left a very narrow wound channel, as did the TS-22 which penetrated deeply.... 

This image copyright R. Sterne, of the Crosman Airgun Forum.


Bottom row, left to right: 

RWS Hobby 11.9 gr. Wadcutter 
RWS MeisterKugeln 14.0 gr. Wadcutter 
RWS Super Hollow Point 14.3 gr. 
RWS Super Dome 14.3 gr. 
RWS Super Point 14.3 gr. 
Crosman Wadcutter 14.3 gr. 
Crosman Premier 14.3 gr. 
Crosman Premier Hollow Point 14.3 gr. 


The wadcutters, in particular the Hobby, showed some shortening and expansion, with a slightly wider initial wound channel.... The RWS Hollow Point stripped off the nose ring, leaving the aft part to penetrate, and left a larger wound channel where the nose stripped off just after entry.... The Crosman Premier Hollowpoint acted basically like it was a roundnose.... 

Want to read more? Click This Link:

READ THE FULL THREAD BY CLICKING HERE


Thursday, March 6, 2014

Sneak Peak (Upcoming Post)

Hello Everyone,


My entire airgun collection has been in the gunsmith shop for quite some time (The Crosman Titan has been there since September 2013, the two Diana P5 pistols have been there since November, the Diana 27 went to him in December, and the Hatsan Supercharger went to the gunsmith in January, as you saw in the last post,) waiting to have different modifications and services performed on them.

Well, I got the two rifles back yesterday, and I am 4-7 days away to getting all three pistols back. (He's waiting for the Cerakote to cure.) I am a very happy camper; there have been some understandable delays (he's one guy, with 3 assistants, trying to provide smithing services for all 3 local law enforcement agencies, plus the general public. My pistols were part of a batch of 19 pistols that were all Cerakoted at the same time!) but it has been worth the wait!

Here's a sneak peak at what's been done. Full details to come in the next post, when I can do a photoshoot of all the guns together.

Take a look at this bad boy! Custom trigger, custom bushings, and custom picatinny!

This thing is silver soldered. It ain't coming off, and it ain't shaking loose!


My antique Diana 27, cleaned and re-lubricated; trigger slightly adjusted, and breech tightened.


Rear sight re-aligned and adjusted.


Until next time, folks, may all of your pellets fly true!